


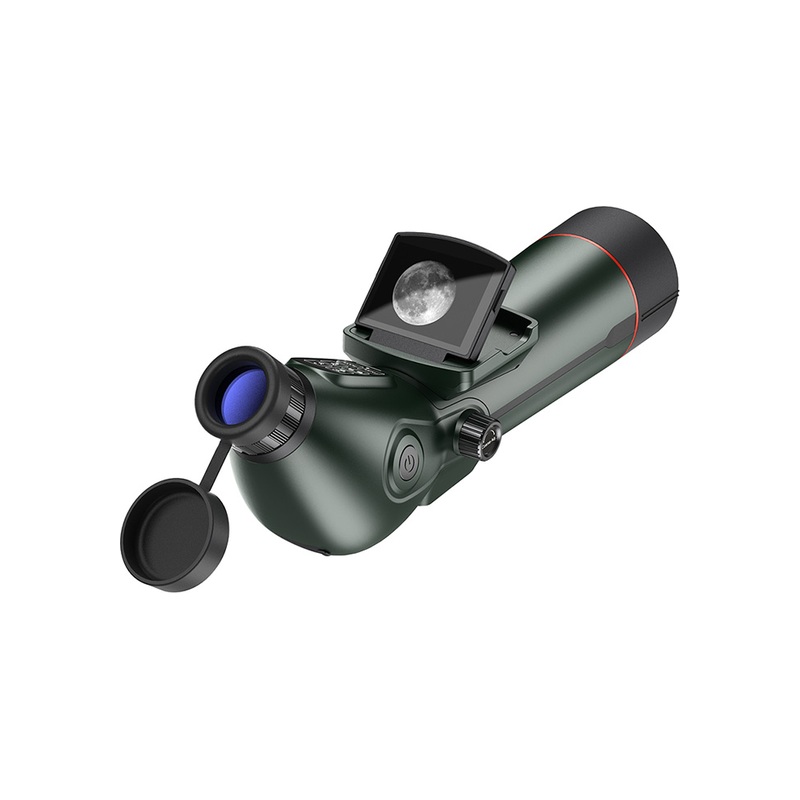
Set up the SPX5 digital telescope for stable viewing, manual focus, photo/video capture and computer connection. Start with the tripod, then adjust the eyepiece and objective separately. Never aim at the Sun.
Mount and Prepare
Secure the bottom mounting thread to a stable tripod and tighten the connection. Remove the eyepiece and objective covers. Keep the telescope away from the Sun and avoid touching or forcing the optical parts.
Charge and Install Storage
With the telescope off, connect the supplied Type-C cable to a suitable DC 5V/2A USB adapter. Red indicates charging; blue indicates full charge. Disconnect after charging. Switch off before inserting a Class 10 or faster microSD card up to 512GB; press inward gently to eject. A memory card is required for file storage.
Format, Language and Time
Back up existing files before formatting, which erases protected files too. In photo or video mode, touch MENU, select Format with Up/Down and confirm Yes with OK. Set Language and Date/Time in the same menu; use MODE to move between date/time fields and OK to confirm. Switch off normally after setting the clock.
Switch Displays and Focus
Hold Power for approximately three seconds to switch on or off. Use the internal/external display button to select the eyepiece or external screen. Open MENU while looking through the eyepiece and turn its diopter wheel until menu text is sharp, then exit MENU. Aim at your subject and gently turn the objective focusing wheel. Release the wheel, allow vibration to settle and fine-tune. These are separate eyepiece and objective adjustments.
Viewing and Capture Modes
Tap MODE to cycle Photo, Video and Playback. Hold MODE to cycle Normal, Moon Viewing and Universe Viewing presets. Tap Up/Down for navigation or exposure shortcuts; hold them for digital zoom. Hold MENU to cycle colour effects. Adjust the external display through its 90-degree range and use the external shade in strong light.
Take Photos
Select Photo mode, compose and focus, then touch Shutter/OK. Use the menu for photo output, single/burst capture, timer and image settings. A 3-, 5- or 10-second timer helps reduce movement from touching the device. Higher photo output settings digitally enlarge the 5MP sensor image.
Record Video and Time-Lapse
Select Video, choose the required video setting and touch Shutter/OK to start or stop. To make a time-lapse, choose Movie Options, Time Lapse Recording; set its 5MP or 8MP output and recording interval. Use MODE to move between interval fields and OK to confirm. Start with Shutter/OK; after a five-second countdown the screen turns off while recording. Press Power to stop time-lapse recording and wake the device.
Review and Transfer Files
Use Playback to review recordings, and back up files before deletion or formatting. With the supplied data cable, connect to the computer and power on. Choose Mass Storage and confirm OK, then copy recordings from DCIM. Alternatively, switch off, remove the card and use a compatible card reader. Do not disconnect during a transfer.
Use PC Camera Mode
Connect the telescope to a computer with the data-capable Type-C cable and power on. Choose PC Camera and confirm OK. Open compatible computer video software and select the connected video device. If it is unavailable, check the mode, cable, USB port and application permissions.
Care and Troubleshooting
Use a clean, soft, lint-free cloth on optical surfaces and the screen. Charge within 10–30°C. For an unresponsive device, check battery charge and use the marked reset hole gently if needed. For an unrecognized card, check orientation, speed and capacity, then back up files before formatting. For a blurred image, adjust the eyepiece and objective separately and stabilize the tripod. Remove obstructions from the viewing path and avoid strong wind. Never view the Sun through this telescope.
Technical Specifications
| Model | SPX5 |
|---|---|
| Image sensor | 5MP starlight CMOS |
| Photo output and field of view | 30MP / 24MP / 16MP / 8MP / 5MP: 1.5° × 1.1°; 1.2MP Moon Viewing; VGA Universe Viewing. Output sizes above the 5MP sensor resolution are digitally enlarged. |
| Video settings and field of view | 4K: 1.5° × 0.9°; 2.7K: 1.4° × 0.9°; FHD: 1.3° × 0.8°; 1080P: 1.5° × 1.1°; HD: 1.5° × 0.9°; HD 60fps: 1.5° × 0.9°; HD Moon Viewing; VGA Universe Viewing. |
| Magnification | Up to 350× system magnification; digital zoom listed separately below |
| Focus | Manual objective focusing wheel |
| Eyepiece adjustment | Diopter compensation ±4 |
| Aperture ratio | F4.0 |
| Objective focal length | 300mm |
| Primary objective diameter | 78mm |
| Limiting magnitude | 11 |
| Digital zoom | 18× |
| Display system | Switchable IPS external screen and electronic eyepiece display; 3.0-inch external screen; internal viewing image described as a 10-inch magnified display |
| External display angle | Adjustable through 90° |
| Controls | Light-touch buttons; separate internal/external display switch |
| Viewing presets | Normal / Moon Viewing / Universe Viewing; hold MODE to switch |
| Reticle | Split 1 / 2 / 3 / 4 / 5 / Off |
| Photo capture | Single / burst of 3, 5 or 10 images / timer Off, 3s, 5s or 10s |
| Anti-shake photo menu | On / Off / Cancel |
| Colour effects | Normal / Black and White / Green / Negative |
| Sharpness | Sharp / Normal / Soft |
| Contrast | High / Normal / Low |
| ISO | Auto / 100 / 200 / 400 / 800 / 1600 / 3200 |
| Exposure compensation | −3.0 to +3.0 EV in steps of 1 |
| Video modes | Normal / Time-lapse recording |
| Time-lapse output | 5MP or 8MP, each 1.5° × 1.1°; user-adjustable interval |
| Video display mode | Full screen / Normal |
| Screen brightness | 7 levels |
| Date stamp | Off / Date / Date and Time |
| Icon auto-clear | Off / 10s / 20s / 30s / 60s; press a button to restore icons |
| Auto power off | Off / 1 / 3 / 5 / 10 minutes |
| Beep and power indicator | Each On / Off |
| Frequency | 50Hz / 60Hz; Cancel exits selection |
| Storage | TF / microSD up to 512GB; Class 10 or faster recommended; memory card sold separately; no internal file storage |
| Battery | Built-in rechargeable 4500mAh lithium battery |
| Charging | Type-C cable; DC 5V/2A USB adapter sold separately; charge with power off; red indicator while charging and blue when full |
| USB modes | Mass Storage / PC Camera with compatible computer video software |
| File transfer | USB Mass Storage or a compatible card reader; recordings in DCIM |
| Microphone and speaker | Built-in |
| Menu languages | English / German / French / Spanish / Italian / Turkish / Russian / Portuguese / Dutch / Simplified Chinese / Traditional Chinese / Japanese / Polish |
| Playback and system tools | Browse recordings; delete selected/all; protect/unprotect files; card formatting; factory reset; date/time adjustment |
| Operating temperature | −20°C to +50°C |
| Storage temperature | −30°C to +60°C |
| Recommended charging temperature | 10°C to 30°C |
| Dimensions | Approximately 369 × 94 × 135mm |
| Weight | Approximately 960g |
| Listed accessories | USB cable, manual and external-screen anti-glare hood; tripod optional |
| Solar safety | Never look directly at the Sun through the telescope or with the naked eye; do not aim this product at the Sun |
Related Product
View the SPX5 digital telescope for product features and configuration enquiries.
